Usually, when extracting the contour of an object, there is noise in the image, and the extraction effect is not ideal. As shown in the following figure,

Extract code:
import cv2
img = cv2.imread("mouse.png")
cv2.imshow("origin",img)
gray = cv2.cvtColor(img,cv2.COLOR_BGR2GRAY)
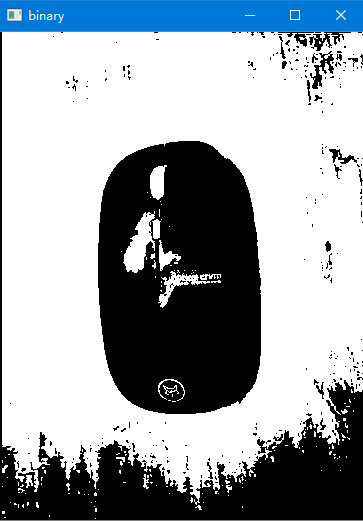
ret,binary = cv2.threshold(gray,128,255,cv2.THRESH_BINARY)
cv2.imshow("binary",binary)
contours, hierarchy = cv2.findContours(binary,cv2.RETR_TREE,cv2.CHAIN_APPROX_SIMPLE)
cv2.drawContours(img,contours,-1,(0,0,255),3)
cv2.imshow("result", img)
cv2.waitKey(0)Extraction effect:
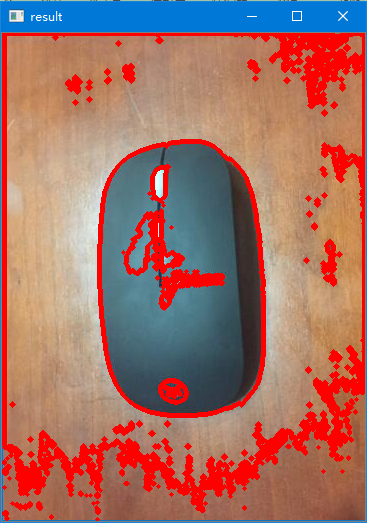
It can be seen that there is very serious noise interference. Therefore, it is necessary to filter the interference of noise before extracting the contour.
Firstly, the image is filtered by mean filter (low-pass filter) to remove noise
blured = cv2.blur(img,(5,5))
cv2.imshow("blur",blured) 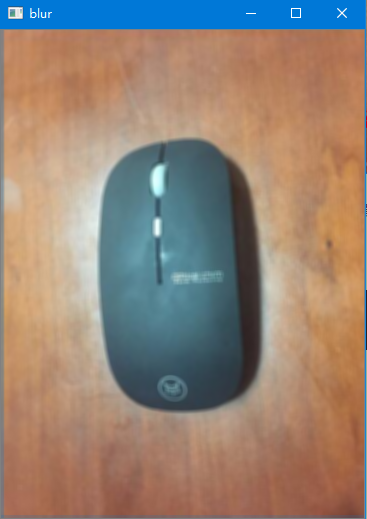
Use flood fill to remove the background around the target. The flood fill class starts with the magic wand tool of ps, which is used to remove the background here.
mask = np.zeros((h+2, w+2), np.uint8)       #The length and width of the mask are two more pixels than the input image, and the flood fill will not exceed the non-zero edge of the mask
#Flood filling
cv2.floodFill(blured, mask, (10,10), (255,255,255), (2,2,2),(3,3,3),8)
cv2.imshow("floodfill", blured)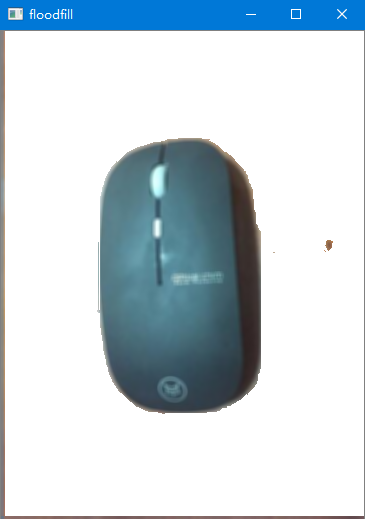
Analysis of floodFill function
- img: the image to be used with the flooding algorithm
- Mask: it is a mask layer. The mask can be used to specify the area in which the algorithm is used. If it is used for a complete image, the size of the mask layer is the number of rows + 2 and the number of columns + 2 of the original image. It is a two-dimensional 0 matrix, and the edge circle will be used. The algorithm is set to 1. Only the position corresponding to 0 on the mask layer can be flooded, so the mask layer is initialized to 0. [dtype:np.uint8]
- Seed: it is the seed point of the flooding algorithm. It also determines whether the pixels with similar colors are flooded according to the pixel judgment of the point.
- newvalue: is the newly assigned value (B,G,R) for the flood area
- (loDiff1,loDiff2,loDiff3): it is the pixel value that can go down relative to the seed point pixel of seed, that is, seed(B0,G0,R0), and the lower boundary of flood area is (B0-loDiff1,G0-loDiff2,R0-loDiff3)
- (upDiff1,upDiff2,upDiff3): it is the pixel value that can go up relative to the seed point pixel of seed, that is, seed(B0,G0,R0), and the upper boundary of flood area is (B0+upDiff1,G0+upDiff2,R0+upDiff3)
- flag: refers to the processing mode of flooding algorithm:
- Lower eight The connectivity of the control algorithm is to take the seed point as the center, then judge the surrounding pixels, and then consider the surrounding pixels in the flood area. Generally 4, 8; The default is 4
- Middle eight It is closely related to the mask layer assignment. Generally, (255 < < 8) is used to make the middle 8 bits all 1, and the value is 255, that is, the part of the mask layer corresponding to the flood area of the original drawing is assigned from the original initial value 0 to 255. If the middle 8 bits are 0, the value is 1
- High eight Specified by the opencv macro parameter
- cv2.FLOODFILL_FIXED_RANGE: change the image and fill in newvalue
- cv2.FLOODFILL_MASK_ONLY: the original image will not be changed, that is, the newvalue parameter will not work, but the mask of the corresponding area will be changed to the value of the middle eight bits
Then it is converted into a grayscale image
1 gray = cv2.cvtColor(blured,cv2.COLOR_BGR2GRAY)
2 cv2.imshow("gray", gray)
At this time, there is unsmooth writing and some noise around the target image, so the opening and closing operation is carried out to obtain a relatively smooth target
1 # define structural elements
2 kernel = cv2.getStructuringElement(cv2.MORPH_RECT,(50, 50))
3 # open close operation: first open the operation to remove the background noise, and then continue to close the operation to fill the holes in the target
4 opened = cv2.morphologyEx(gray, cv2.MORPH_OPEN, kernel)
5 closed = cv2.morphologyEx(opened, cv2.MORPH_CLOSE, kernel)
6 cv2.imshow("closed", closed)
Then it is converted into a binary image to obtain the outline of the image
Finally, the contour is extracted and the target is captured
1 # find the contour
2 _,contours, hierarchy = cv2.findContours(binary,cv2.RETR_TREE,cv2.CHAIN_APPROX_SIMPLE)
3 # draw outline
4 cv2.drawContours(img,contours,-1,(0,0,255),3)
5 # draw results
6 cv2.imshow("result", img)
All codes:
#coding=utf-8
import cv2
import numpy as np

img = cv2.imread("temp.jpg")                #Load Image
h, w = img.shape[:2]                        #Gets the height and width of the image
cv2.imshow("Origin", img)                   #Display original image

blured = cv2.blur(img,(5,5))                #Filter to remove noise
cv2.imshow("Blur", blured)                  #Displays the image after low-pass filtering

mask = np.zeros((h+2, w+2), np.uint8)       #The length and width of the mask are two more pixels than the input image, and the full water filling will not exceed the non-zero edge of the mask
#Flood filling
cv2.floodFill(blured, mask, (w-1,h-1), (255,255,255), (2,2,2),(3,3,3),8)
cv2.imshow("floodfill", blured)

#Get gray image
gray = cv2.cvtColor(blured,cv2.COLOR_BGR2GRAY)
cv2.imshow("gray", gray)


#Define structural elements
kernel = cv2.getStructuringElement(cv2.MORPH_RECT,(50, 50))
#Opening and closing operation: first, the opening operation removes the background noise, and then continue the closing operation to fill the holes in the target
opened = cv2.morphologyEx(gray, cv2.MORPH_OPEN, kernel)
closed = cv2.morphologyEx(opened, cv2.MORPH_CLOSE, kernel)
cv2.imshow("closed", closed)

#Finding binary graph
ret, binary = cv2.threshold(closed,250,255,cv2.THRESH_BINARY)
cv2.imshow("binary", binary)

#Find contour
_,contours, hierarchy = cv2.findContours(binary,cv2.RETR_TREE,cv2.CHAIN_APPROX_SIMPLE)
#Draw outline

cv2.drawContours(img,contours,-1,(0,0,255),3)
#Draw results
cv2.imshow("result", img)

cv2.waitKey(0)
cv2.destroyAllWindows()