catalogue
1, Raspberry pie installation Ubuntu 18.04
1 download ubuntu system files
two Burn system files into SD card
3 force modification of HDMI output resolution (this step can be ignored)
4. Set wifi (this step can also be ignored. Connect the network cable and install the desktop later)
5 insert the memory card and install the Ubuntu system
6. Configure WIFI from the command line
seven Install desktop environment
2, Install clash (scientific Internet)
1. Binary installation (recommended)
6, Serial port configuration of raspberry pie
1. Binary installation (simple and short time, but easy to fail)
2. vcpkg installation (failed)
3. Source code installation (a long time)
9, Install realsense_ros(realsense2_camera)
1, Raspberry pie installation Ubuntu 18.04
1 download ubuntu system files
The system provided by the official website of ubuntu for raspberry pie has been upgraded to ubuntu 20, so this paper downloads the system files of ubuntu 18 from the open source mirror website of Tsinghua University. At present, there is only the server version. You need to manually install the desktop later. Raspberry Pie 4 selects arm64 bit.
https://mirrors.tuna.tsinghua.edu.cn/ubuntu-cdimage/releases/bionic/release/ubuntu-18.04.5-preinstalled-server-arm64%2Braspi4.img.xz
Also available on this website: Index of / Ubuntu CDImage / Ubuntu / releases / | Tsinghua Open Source Mirror Download other versions of the system
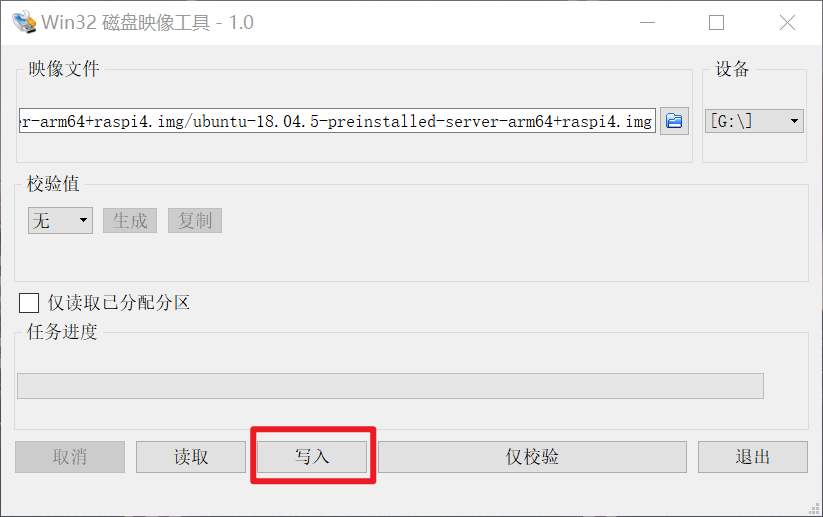
two Burn system files into SD card
windows Platform: use software such as 7zip to unzip the ubuntu system file into an img image file, and then use the win32 disk imager Burn in SD card
3 force modification of HDMI output resolution (this step can be ignored)
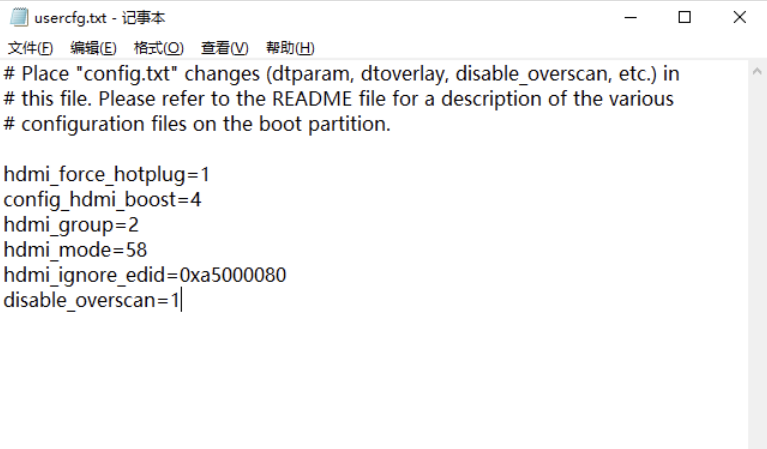
In the "usercfg.txt" file, write the following:
hdmi_force_hotplug=1
config_hdmi_boost=4
hdmi_group=2
hdmi_mode=58
# hdmi_drive=2
hdmi_ignore_edid=0xa5000080
disable_overscan=1
hdmi_force_hotplug: force HDMI output
config_hdmi_boost: HDMI signal enhancement.
hdmi_group,hdmi_mode: sets the resolution. Because there is no 1920 * 1080 60Hz, I chose 1680 * 1050 60Hz
hdmi_drive: force audio output to HDMI port. Delete this line if you do not want to output audio through an analog signal. On the contrary, remove the comment number above
hdmi_ignore_edid: press HDMI forcibly_ Group and hdmi_mode specifies the resolution output. The resolution of the display itself is not detected.
disable_overscan: forcibly prohibit the retention of black edge function.
4. Set wifi (this step can also be ignored. Connect the network cable and install the desktop later)
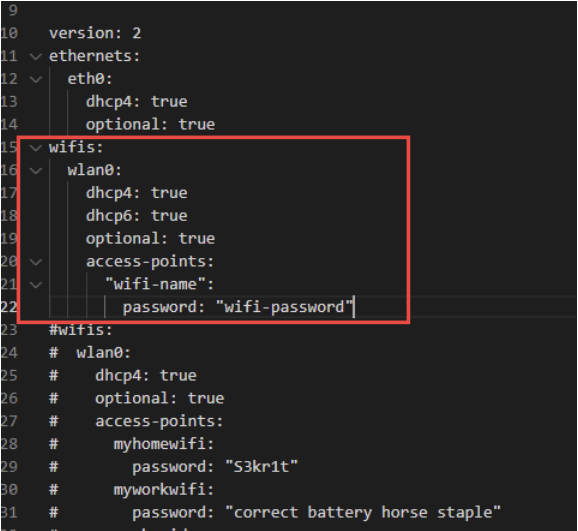
Open the network config file in the root directory of the system boot disk and write the following content: wifi name Corresponding to the wifi name you want to connect, wifi password Corresponding wifi password.
wifis:
  wlan0:
    dhcp4: true
    dhcp6: true
    optional: true
    access-points:
      "wifi-name":
        password: "wifi-password"
5 insert the memory card and install the Ubuntu system
Pay attention to this step to ensure that the insertion direction of the memory card is correct and well connected. Before power on, ensure that the raspberry pie is not connected to any equipment except the mouse and keyboard, especially the serial port. Otherwise, it is easy to cause random code during startup and normal system installation.
If the peripherals are connected before startup, the serial port data sent by the serial port peripherals will interfere with the startup of ubuntu, because when ubuntu is powered on, the u-boot (similar to bootloader) will wait for the serial port data for 2s by default before entering the autoboot to open the system. During this period, once there is serial port data, it will enter the u-boot (similar to pressing F2 to enter the BIOS when the computer is powered on). This will cause the system to fail to open, and the screen will always display the garbled code sent by the serial port device.
The solution is to cancel the 2s waiting time of the u-boot and directly enter the system (but this will also lead to no u-boot in the future). The solution for subsequent updates
6. Configure WIFI from the command line
First execute the following command:
sudo vi /etc/netplan/50-cloud-init.yaml
For example, the name of the mobile hotspot is xiaomi and the password is 12345678,
Then modify the configuration file as follows:
network:
    ethernets:
        eth0:
            dhcp4: true
            optional: true
    version: 2
    wifis:
        wlan0:
            dhcp4: true
            access-points:
                "xiaomi":
                     password: "12345678"
In the vim editor, enter the letter "i" to enter the editing mode, press the direction key to control the cursor position, "ctrl+o" to save and exit the editing state, press "shift +;" and then enter "wq", and then enter to exit the vim editor
After modification and saving, check the syntax and make the configuration effective
sudo netplan generate
sudo netplan apply
Wait a minute. If not, restart the raspberry pie.
seven Install desktop environment
After entering, you need an account and password: ubuntu is the default at the beginning
Then you need to change the password
Then you can enter the terminal interface
Update the source first, and then restart
sudo apt-get update
sudo apt-get upgrade
reboot
After entering the system again, download the desktop environment for a long time and wait patiently
sudo apt-get install ubuntu-desktop
It's not completely successful. We need to follow the prompt and enter the command
sudo apt-get update --fix-missing
After the download, restart and enter the download command again
reboot
sudo apt-get install ubuntu-desktop
Then run the desktop environment
startx
2, Install clash (scientific Internet)
It's easy to be harmonious. If you need it, you can talk to me privately
3, Install remote desktop
I am used to using nomachine, or I can install VNC myself
stay nomachine official website Download the corresponding version and install it. The Ubuntu system can be selected according to the needs of the system. You can download it on the windows computer and copy it. Double click to install it successfully.
4, Install ROS melody
1. Install ros full version
reference resources cn/melodic/Installation/Ubuntu - ROS Wiki Step for installation
2. rosdep init solution
After installing ROS, the initialization command sudo rosdep init fails, prompting: sudo: rosdep:command not found
Solve the problem as follows:
sudo apt install rospack-tools
The following error will occur when rosdep init is executed normally because the website is blocked
ERROR: cannot download default sources list from:
https://raw.githubusercontent.com/ros/rosdistro/master/rosdep/sources.list.d/20-default.list
Website may be down.
The function of this step is to create a file named "20-default.list". We can open the website with a browser and copy the contents of the web page:
First create the "20-default.list" file
sudo mkdir -p /etc/ros/rosdep/sources.list.d
cd /etc/ros/rosdep/sources.list.d
sudo gedit 20-default.list
Copy the following into the 20-default.list file
# os-specific listings first
yaml https://raw.githubusercontent.com/ros/rosdistro/master/rosdep/osx-homebrew.yaml osx

# generic
yaml https://raw.githubusercontent.com/ros/rosdistro/master/rosdep/base.yaml
yaml https://raw.githubusercontent.com/ros/rosdistro/master/rosdep/python.yaml
yaml https://raw.githubusercontent.com/ros/rosdistro/master/rosdep/ruby.yaml
gbpdistro https://raw.githubusercontent.com/ros/rosdistro/master/releases/fuerte.yaml fuerte

# newer distributions (Groovy, Hydro, ...) must not be listed anymore, they are being fetched from the rosdistro index.yaml instead
Then execute rosdep update
5, Installing MAVROS
Refer to the official website:
MAVROS | PX4 autopilot User Guide
mavros/mavros at master · mavlink/mavros · GitHub
1. Binary installation (recommended)
sudo apt-get install ros-melodic-mavros ros-melodic-mavros-extras
wget https://raw.githubusercontent.com/mavlink/mavros/master/mavros/scripts/install_geographiclib_datasets.sh
An install will appear in the root directory_ geographiclib_ Datasets.sh file, right-click properties, modify executable permissions, and then run the following instructions:
./install_geographiclib_datasets.sh
The location of mavros package for binary installation is: / opt / ROS / melody / share / mavros. You may need to modify the contents of px4.launch file later
2. Source installation
sudo apt-get install python-catkin-tools python-rosinstall-generator -y
# For Noetic use that:
# sudo apt install python3-catkin-tools python3-rosinstall-generator python3-osrf-pycommon -y

# 1. Create the workspace: unneeded if you already has workspace
mkdir -p ~/catkin_ws/src
cd ~/catkin_ws
catkin init
wstool init src

# 2. Install MAVLink
#    we use the Kinetic reference for all ROS distros as it's not distro-specific and up to date
rosinstall_generator --rosdistro kinetic mavlink | tee /tmp/mavros.rosinstall

# 3. Install MAVROS: get source (upstream - released)
rosinstall_generator --upstream mavros | tee -a /tmp/mavros.rosinstall
# alternative: latest source
# rosinstall_generator --upstream-development mavros | tee -a /tmp/mavros.rosinstall
# For fetching all the dependencies into your catkin_ws, just add '--deps' to the above scripts
# ex: rosinstall_generator --upstream mavros --deps | tee -a /tmp/mavros.rosinstall

# 4. Create workspace & deps
wstool merge -t src /tmp/mavros.rosinstall
wstool update -t src -j4
rosdep install --from-paths src --ignore-src -y

# 5. Install GeographicLib datasets:
./src/mavros/mavros/scripts/install_geographiclib_datasets.sh

# 6. Build source
catkin build

# 7. Make sure that you use setup.bash or setup.zsh from workspace.
#    Else rosrun can't find nodes from this workspace.
source devel/setup.bash
6, Serial port configuration of raspberry pie
First run After roslaunch mavros px4.launch, the following problems will occur:
FCU: DeviceError:serial:open: No such file or directory
First, modify the serial port number and baud rate of px4.launch file. The serial port number I use is ttyAMA0 and the baud rate is 115200
cd /opt/ros/melodic/share/mavros/launch
sudo vim px4.launch
Run again After roslaunch mavros px4.launch, the following problems will occur:
FCU: DeviceError:serial:open: Permission denied
Method 1:
This is to modify the serial port configuration file of raspberry pie. Refer to the link:
Please follow these 6 steps carefully
Step 1 - Install Raspbian Jessie onto a SD card and boot the Pi when connected to a network Login via terminal or desktop and shell Configure the system with:
sudo raspi-config
Expand filesystem and enable serial on advanced page, exit and reboot.
Step 2 -this won't necessary if you have jessie new release Update the system with:
sudo apt-get update

sudo apt-get upgrade
Step 3 - Device Tree settings as below:
Add device tree to /boot/config.txt to disable the Raspberry Pi 3 bluetooth.
sudo vim /boot/config.txt
Add at the end of the file
*if you want to change the blutooth to miniuart port(bad)
dtoverlay=pi3-miniuart-bt
*if you want to disable the blutooth(good)
dtoverlay=pi3-disable-bt
Exit the editor saving your changes.
Step 4 - reboot the pi
sudo reboot
step 5 -
a)to disable the Serial Console edit the file using
sudo vim /boot/cmdline.txt
remove the word phase "console=serial0,115200" or "console=ttyAMA0,115200"
Exit and save your changes
b)to Enable the Serial Console edit the file using
sudo vim /boot/cmdline.txt
Change the file to the following:
dwc_otg.lpm_enable=0 console=tty1 console=serial0(or ttyAMA0),115200 root=/dev/mmcblk0p2 rootfstype=ext4 elevator=deadline fsck.repair=yes rootwait
Exit and save your changes
Step 6 - reboot the pi
sudo reboot
Method 2:
Because I am not installing a Raspian system, I cannot open the serial port with raspi config.
It is also described in / boot/firmware/config.txt of ubuntu server raspi system. enable_uart=1 enables the serial port by default. The name in linux is / ttyAMA0, but the default is when the serial port console is used (/ boot/firmware/nobtcmd.txt also writes console = /ttyAMA 921600)
And the hardware serial port is also connected with Bluetooth. If you want to use this serial port for other peripherals, you must disable the serial port console and Bluetooth.
method:
1. Delete console = /ttyAMA 921600 in / boot/firmware/nobtcmd.txt to disable the serial port console. This TXT file can also be found in the system boot by inserting the sd card into the windows system with the card reader.
2. Set enable in / boot/firmware/config.txt_ UART = 1 (default is). If = 0, minicom serial port is enabled instead of this hardware serial port.
3. Add a line dtoverlay = disable BT to / boot/firmware/config.txt to disable Bluetooth.
4. sudo systemctl disable bluetooth... Disable Bluetooth related startup items. Until the Bluetooth logo is no longer displayed on the desktop, but / ttyAMA0 still exists.
In this way, connect the serial port peripherals after startup, and use / ttyAMA0 to communicate with the serial port normally.
Finally, to modify the serial port permissions:
sudo chmod a+rw /dev/ttyAMA0
The above steps are to temporarily open the serial port permission. To permanently open the serial port permission, refer to the link:
View user groups first
ls -l /dev/ttyA*
Terminal output:
crw--w---- 1 root tty 204, 64 Oct 5 07:55 /dev/ttyAMA0
You can see that the user root belongs to tty, so one way is to add our current user name to this user group.
whoami
Terminal output:
ubuntu
Then the terminal inputs:
sudo usermod -aG tty ubuntu
Finally, logout logs in to the system, and the login name ubuntu can use the serial port
7, Install librealsense
1. Binary installation (simple and short time, but easy to fail)
Reference link: librealsense/distribution_linux.md at master · IntelRealSense/librealsense · GitHub
sudo apt-key adv --keyserver keyserver.ubuntu.com --recv-key F6E65AC044F831AC80A06380C8B3A55A6F3EFCDE || sudo apt-key adv --keyserver hkp://keyserver.ubuntu.com:80 --recv-key F6E65AC044F831AC80A06380C8B3A55A6F3EFCDE
sudo add-apt-repository "deb https://librealsense.intel.com/Debian/apt-repo $(lsb_release -cs) main" -u
sudo apt-get install librealsense2-dkms
sudo apt-get install librealsense2-utils
But this method is often used in Error sudo apt get install librealsense2 DKMS
2. vcpkg installation (failed)
Reference link: GitHub - IntelRealSense/librealsense: Intel® RealSense™ SDK
You can download and install librealsense using the vcpkg dependency Manager:
git clone https://github.com/Microsoft/vcpkg.git
cd vcpkg
./bootstrap-vcpkg.sh
./vcpkg integrate install
./vcpkg install realsense2
3. Source code installation (a long time)
3.1 installing dependent packages
sudo apt-get update && sudo apt-get upgrade && sudo apt-get dist-upgrade
sudo apt-get install git cmake libssl-dev libusb-1.0-0-dev pkg-config libgtk-3-dev
sudo apt-get install libglfw3-dev libgl1-mesa-dev libglu1-mesa-dev
The second line is the core dependency, which must be installed. The third line is 3D related dependencies. If you do not intend to use realsense viewer, you can not install it.
three point two Download Realsense SDK
git clone https://github.com/IntelRealSense/librealsense.git
cd ~/librealsense
Or go directly to the above address to download the zip package and unzip it
3.3 compilation preparation
mkdir build && cd build
cmake ../ -DCMAKE_BUILD_TYPE=Release -DBUILD_EXAMPLES=true -DFORCE_RSUSB_BACKEND=ON -DBUILD_WITH_TM2=false -DIMPORT_DEPTH_CAM_FW=false
three point four compile
sudo make uninstall && make clean && make && sudo make install
This step takes about 1 ~ 2 hours. It's slow anyway..
3.5 setting udev rules
sudo ./scripts/setup_udev_rules.sh
You will be prompted to unplug the camera and press any key, mainly to make it easier for realsense viewer to identify the device
3.6 testing
realsense-viewer
8, Install VIO
Reference link: GitHub - Auterion/VIO: Interface PX4 with Realsense T265
-
This is a ROS package, it assumes you have either ROS Kinetic (Ubuntu 16.04) or ROS Melodic (Ubuntu 18.04) installed, instructions can be found here. Please also make sure you install librealsense from here.
-
Install catkin and create your catkin workspace directory.
sudo apt install python-catkin-tools
mkdir -p ~/catkin_ws/src
-
Clone this repository in your catkin workspace.
cd ~/catkin_ws/src
git clone https://github.com/Auterion/VIO.git
-
Install MAVROS (version 0.29.0 or above).
Note: Instructions to install MAVROS from sources can be found here.
- Melodic
sudo apt install ros-melodic-mavros ros-melodic-mavros-extras
- Kinetic
sudo apt install ros-kinetic-mavros ros-kinetic-mavros-extras
- Melodic
-
Build the package:
cd ~/catkin_ws
catkin build px4_realsense_bridge
-
Run th ROS node:
cd ~/catkin_ws/src
roslaunch px4_realsense_bridge bridge_mavros.launch
9, Install realsense_ros(realsense2_camera)
Reference link: GitHub - IntelRealSense/realsense-ros: Intel(R) RealSense(TM) ROS Wrapper for D400 series, SR300 Camera and T265 Tracking Module
1. Binary installation
realsense2_ The camera is an ROS distribution in the form of debian software package. You can install by typing the following in / opt/ros/melodic/share/realsense2_camera/launch, which may need to be modified later rs_ Contents of camera.launch file
sudo apt-get install ros-$ROS_DISTRO-realsense2-camera
2. Source installation
- Create a catkin workspace Ubuntu
mkdir c:\catkin_ws\src
cd c:\catkin_ws\src
- Clone the latest Intel® RealSense™ ROS from here into 'catkin_ws/src/'
git clone https://github.com/IntelRealSense/realsense-ros.git
cd realsense-ros/
git checkout `git tag | sort -V | grep -P "^2.\d+\.\d+" | tail -1`
cd ..
- Make sure all dependent packages are installed. You can check .travis.yml file for reference.
- Specifically, make sure that the ros package ddynamic_reconfigure is installed. If ddynamic_reconfigure cannot be installed using APT or if you are using Windows you may clone it into your workspace 'catkin_ws/src/' from here
catkin_init_workspace
cd ..
catkin_make clean
catkin_make -DCATKIN_ENABLE_TESTING=False -DCMAKE_BUILD_TYPE=Release
catkin_make install
echo "source ~/catkin_ws/devel/setup.bash" >> ~/.bashrc
source ~/.bashrc
To start the camera node in ROS:
roslaunch realsense2_camera rs_camera.launch